Friday, June 3, 2016

New Deal: 300 Professional Lightroom Presets for 1-Click Photo Editing

If you want to reduce the amount of time you spend on post processing and get amazing results with your photos, these Lightroom presets could be the answer. We were able to negotiate an exclusive 70% discount for our readers this week (ending soon) which includes 14 different collections for a total of 300 presets that will totally change your work in Lightroom. Deal found here: PresetKingdom Complete Lightroom Presets Bundle

haze lightroom presets

Professional Lightroom Presets (Click to See Before & After Examples)

This included set of presets will give your photos a haze effect. A variety of different effects are included in the pack, and some will add a small amount of color in the haze effect.

detail lightroom presets

Detail Lightroom Presets

This set can be used to get sharp photos that emphasize the details.

Color Quest Lightroom Presets

Color Quest Lightroom Presets

There are a number of presets that are useful for boosting and popping colors, creating cross processed looks, and other types of color effects. This set will allow you to create a variety of different color effects with your photos.

pastel lightroom presets

Pretty Pastel Lightroom Presets

This set will give beautiful, soft pastel effects to your photos.

split toning lightroom presets

Split Toning Lightroom Presets

This pack will give split toning effects to your photos. Includes a variety of different strengths of effects and different colors.

matte lightroom presets

Matte Lightroom Presets

This set will give your photos beautiful matte effects. There are a wide variety of effects, including 29 color matte effects and 11 monochromatic matte effects.

landscape lightroom presets

Landscape Lightroom Presets

These were created especially for landscapes and nature photos. You’ll be able to easily boost colors, enhance golden hour photos, and more.

portrait lightroom presets

Portrait Lightroom Presets

This pack will help you to create beautiful portraits.

black and white lightroom presets

Black & White Lightroom Presets

Creating beautiful black & white photos requires more than simply converting your color image to black & white or completely desaturating the image. Lightroom offers plenty of potential for making your black & whites amazing, but like anything else involved in photo editing, it can take time. These black & white Lightroom presets you will get a huge collection of presets that can help to turn your color photos into beautiful black & whites very quickly.

film lightroom presets

Film Lightroom Presets

This set of Lightroom presets is prefect for getting a film-like look with your photos. The pack includes 11 presets for color effects and 5 presets for black & white film looks.

hdr lightroom presets

HDR Lightroom Presets

HDR effects are extremely popular, and with these presets you can create stunning HDR effects with a single photo, no need to have multiple bracketed exposures of the same shot. There are 45 presets in this set, including subtle and natural HDR effects as well as more intense and extreme effects. You’ll love the way they can transform your photos.

mono lightroom presets

Mono Lightroom Presets

This pack makes it easy for you to create beautiful monochromatic photos. The presets will convert your photos to black & white, and then add a small tint of color.

retro lightroom presets

Retro Lightroom Presets

The presets are simple to install and are compatible with Lightroom 4, 5, 6, and CC. They work on both Mac and PC, and can be used with RAW or JPG files.

How to Get All These Preset Collections for a Discount This Month:

We were able to negotiate a 70% discount for our readers this week which ends soon ($ 29 down from $ 99). They also carry a 60 day guarantee, if you are not satisfied with any of the presets just let them know and they will give you a full refund so there is no risk in trying them.

Deal found here: 300 Professional Lightroom Presets for 1-Click Photo Editing

Go to full article: New Deal: 300 Professional Lightroom Presets for 1-Click Photo Editing

What are your thoughts on this article? Join the discussion on Facebook

Article from: PictureCorrect

PictureCorrect

If you are interested in Camera Tips, check it out here for more details.


from SLR Camera http://ift.tt/22BTtdK

Wednesday, June 1, 2016

How to Shoot Through Glass Without Unwanted Reflections

shootthroughglassfeat
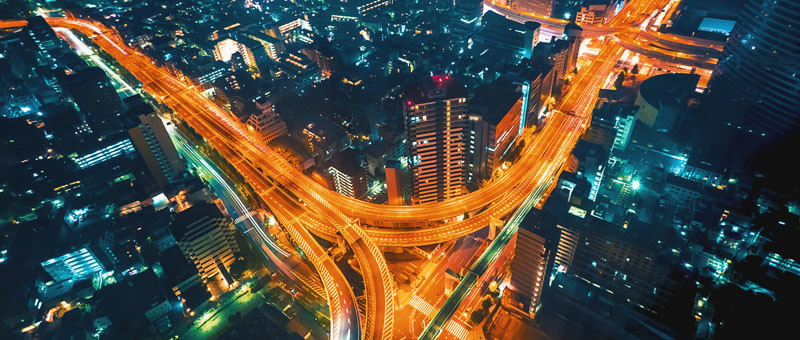
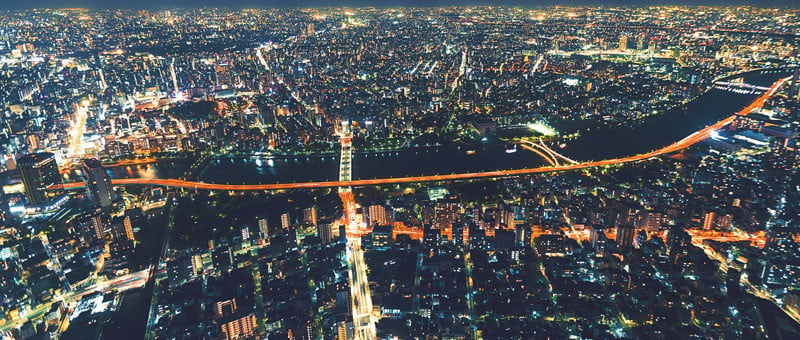
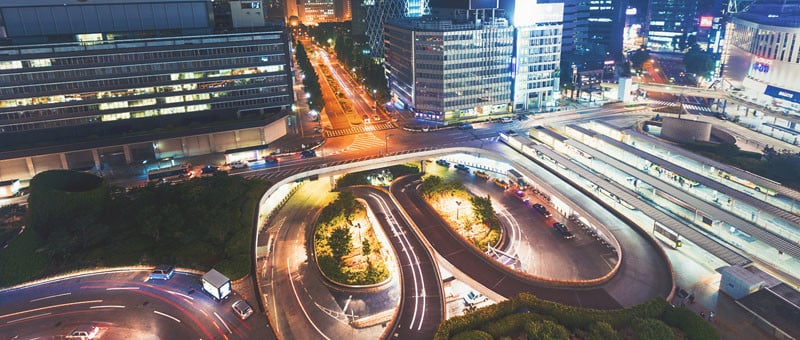
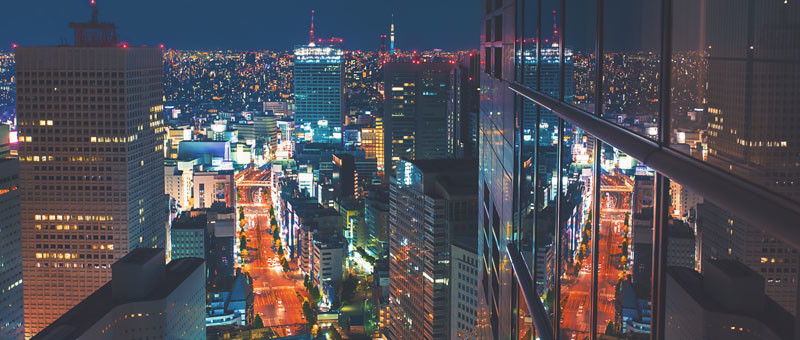
My name is Justin Tierney, and I’m a time-lapse photographer based in Japan. The opening section of my latest time-lapse project features nocturnal Japanese cityscapes. All the shots were captured from high hotel windows or observation towers around Tokyo. In this short article I share how I was able to create these shots without unwanted window reflections.


Dim the Lights

When shooting from a hotel room or anywhere you have control of the environment, do everything you can to minimize the interior light. When shooting at night, make use of any shades or blinds in the room. Pull them over your camera to help block stray ambient light. Avoid this in daylight as the curtains or blinds will actually create reflections.
Time-lapse still from At the Conflux, Aerial Arterial, taken from my hotel room window in Shinjuku, Tokyo. Settings: f/3.2, 8’, 16mm.
When shooting from an observation tower, try to find a dark spot in the room and see if there are elements of the architecture (pillars, support beams, etc.) you can use to block light.

Get Close

Get the lens as close to the window as possible. To accomplish this, I use a long (200cm) quick-release Arca Swiss tripod plate to allow easy adjustment. I usually try not to touch the lens to glass as the movement and vibrations of the building can bump the camera.

Use a Lens Skirt

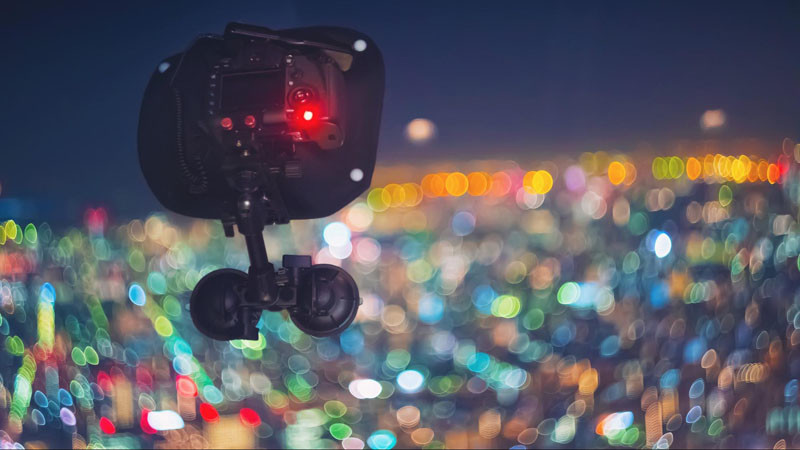
The Lens Skirt is the best solution I’ve found so far. As long as I don’t shoot at an extreme angle, it cuts out reflections completely. It also folds flat for easy storage and carrying.
Lens Skirt with Fat Gecko suction cup tripod mount from the cafe at Tokyo Skytree observatory
The resulting time-lapse still from the above setup at the Tokyo Skytree as it appears in At the Conflux. Settings: f/2.8, 10’, 16mm.
I wish the lens skirt was larger at times — particularly when shooting at 16mm or wider. The problem of size is compounded when shooting with the camera at a severe angle. This can be remedied somewhat by affixing gaffers tape to the edges of the skirt to extend its reach and seal its seams.
If the $50 price tag is too steep, you can make your own version such as this one by photographer Michael Courier.

Try a Polarizer

Many photographers report success with using a polarizing filter to remove reflections. For me, it’s hit or miss. A polarizer seems to help reduce reflections but not eliminate them. This can make matters worse. If you don’t have the luxury of shooting with an external monitor, it can be hard to tell if a reflection is present or not. The reflections may appear to vanish on the tiny camera LCD screen, but later, to your dismay, a computer monitor may reveal otherwise.
Another issue with polarizing filters is that you have to buy and carry one for each lens. You can buy a series of step-up and step-down rings, but since the filter is not the best solution, I avoid it all together.
Time-lapse still from At the Conflux, shot through a restaurant window in Tokyo. Settings: f/5.6, 8’, 16mm.

Try a Rubber Lens Hood

I’ve tried one of these but was not convinced of its value. It works well when the camera is straight. But I frequently tilt the camera down or to the side to create the composition I want, and this makes the lens hood less effective at blocking reflections. And, similar to a polarizer, you have to buy and carry a hood for each lens which is not ideal.
Time-lapse still from At the Conflux, shot from a hotel lobby in Tokyo. Settings: f/3.5, 2.5’, 35mm.

Suction Cup Tripod

The Fat Gecko suction cup tripod and the Lens skirt is my go-to combo for time-lapsing through glass. It’s easy to transport. And, when used with the long QR plate mentioned above, easy to setup. It has the added attributes of stealth and speed. In some situations a tripod is too conspicuous. With practice I was able to rapidly mount it all kinds of places–from glass elevators, taxi side windows, monorail windshields and hotel lobbies without calling attention to myself.
These next photos show how I used my favorite combination of a suction cup tripod with a Lens Skirt to shoot through glass without reflections from my hotel window, the Kobe Portliner Monorail, and the Yurikamome transit:
image02
image04
image09
Here are two time-lapse stills from At the Conflux, both shot through the windshield of automated monorails. The Kobe Port Liner during the day and Tokyo’s Yurikamome. Settings: f/8, 0.6’, 20mm, and f/2.8, 1.6’, 16mm, respectively:
image07
image08
If you have tips of your own for shooting through glass, please share them in the comments below. Check out my latest project, At The Conflux on my channels on Vimeo, YouTube and follow me on Instagram or Facebook for my latest time-lapse clips.


About the author: Justin Tierney is a time-lapse film maker and classically trained composer of concert and film music.His music was declared “superb, robust, and grand” by the Boston Globe who stated that that “Tierney’s dark-hued music had polished, ominous richness… and sound-worlds that were cogent and immediate.” His most recent project, At The Conflux, combines time-lapse images and original music into a film exploring the rhythm of Japanese cityscapes. Tierney holds degrees from Yale, Tufts, and is currently pursuing a PhD at Duke University.


Setting new standards: Nikon D5 Review


Introduction

The Nikon D5 is the company's flagship action-oriented DSLR, sporting a 20.8MP full-frame sensor, 153-point autofocus system and a full-size, double-grip chassis that is both tough as nails and exceedingly comfortable to use. Though the core build of this camera remains very similar to the D4S, the sensor and autofocus system are entirely new and - as we'd expect - designed with speed and reliability in mind.

Nikon D5 Key Specifications

  • All new Nikon-designed 20.8MP full-frame image sensor
  • Expeed 5 processor
  • All new 153-point phase detection autofocus system with 99 cross-sensors
  • Automated autofocus fine tune
  • Native ISO range now stretches from 100-102,400
  • 12fps continuous shooting with full autofocus and autoexposure
  • 4K video recording
  • Offered in dual CF and dual XQD memory card configurations
  • Touchscreen functionality during both stills and video shooting
  • CIPA rating of 3,780 shots per charge using the same EN-EL18a battery as D4S
Due to its large size and tip-top placement in Nikon's lineup, the D5 originally struck me as a somewhat intimidating camera to put through a thorough review. But really, with a little bit of work to get it set up the way I like and the development of some muscle memory as to where all the proper buttons are, the D5 has proven to be one of the most reliable, and as such, one of the least stressful cameras I've ever had the pleasure of using. Of course, that doesn't mean that it isn't meant to be put through stressful situations. Quite the opposite.
Here's a quick comparison of the key specs of the D4S, D5 and 1D-X II.
  Nikon D4S   Nikon D5  Canon 1D-X II
MSRP $6499 $6499 $5999
Sensor 16.2MP CMOS 20.8MP CMOS 20.2MP CMOS
ISO range
(native)
100-25,600 100-102,400 100-51,200
AF points 51 153 61
RGB metering sensor resolution 91k pixel 180k pixel 360k pixel
LCD 3.2" 920k-dot 3.2" 2.36M-dot touch-enabled 3.2" 1.62M-dot touch-enabled
Burst rate 11 fps 12 fps 14 fps
Video 1080/60p 4K/30p 4K/60p
Battery life (CIPA) 3020 shots 3780 shots 1210 shots
Dimensions 160 x 157 x 91mm 160 x 159 x 92mm 158 x 168 x 83mm
Weight 1350 g 1405 g (XQD) 1530 g
Clearly, there are some exciting innovations hidden beneath the D5's skin, but in the end, it's likely not the most exciting camera to the average consumer. So in an age of decreasing camera sales, why does Nikon bother to continue producing such machines? Well, in the most extreme of situations, phones and lesser digital cameras will simply be unable to capture the same sorts of moments that flagship cameras like the D5 are, from the get-go, built to capture.
2016 is an Olympic year, and it's not a coincidence that this year has seen new flagship DSLRs from from both Canon and Nikon.
Of course, the D5 isn't just for shooting the Olympics. Processed to taste from Raw. Photo by Carey Rose. Nikon 135mm F2D | F4 | 1/200 sec | ISO 400

Here is the beef

There's no denying that the Nikon D5 is one beefy camera. Without a lens, it weighs 1405g, or just over three pounds. But there's a good reason for that. The D5 is over-engineered on purpose - it's built to take a knock, a drop or a flying rock kicked up from a dirt-bike. It might even take a bullet, but we're not really allowed to test that. And with a properly sealed lens attached, the D5 should also stand up to a downpour and freezing conditions with ease. This camera comes with a tough magnesium-alloy shell, one that feels like you could pound nails with (we didn't try).
The D5's robustness means I can focus more on the action and less on whether or not I'm going to hurt the camera. Processed and cropped to taste in Adobe Camera Raw. Photo by Carey Rose. Nikon AF-S 300mm F4 PF | F4 | 1/2000 sec | ISO 200
Another contributor to the D5's beefiness is its battery. It's CIPA-rated to 3,780 shots, which not only promises an absurd amount of shooting between charges, but is also a sign of increased efficiencies within the camera. Despite more megapixels, a faster burst rate and a more computationally intensive autofocus system, the rating has increased compared to its predecessor, which uses the same battery pack. (Fun fact: to save you the trouble of opening your calculator app, the CIPA rating of 3,780 shots actually only translates to five minutes and fifteen seconds of shooting at its burst rate of 12fps.)

The Evolution

I'm a long-time Nikon shooter, but not one that's personally invested in pro-level bodies from the Dx series. At first, if you've used even a semi-pro body from Nikon's recent past, you'll feel familiar with the D5. But when you get more familiar with the camera (and as we cover in detail on our 'Body & Design' page), Nikon's made some changes to the button layout of the D5 that will have some users scratching their heads, and others praising the ergonomic improvements from the added level of button customization.
Streetlight-and-strobe-lit. Processed to taste from Raw. Photo by Carey Rose. Tamron 85mm F1.8 SP VC | F1.8 | 1/125 sec | ISO 12800
In summary, the D5 is a camera that will be lusted over by a lot of enthusiasts, but largely abused by its intended customer base - working professionals. These photographers will simply pick it up, do their best to re-assign all their buttons the way they had re-assigned them on their D4S's, and get to work. For long-time sports shooters and wedding photographers, a more comprehensive rethink and redesign of cameras like this would probably not go over well.
Instead, the evolving Dx line continually provides meaningful updates that will make it easier for established pros to capture images that they already know how to take. In this vein, the D5 is indeed a worthy upgrade and successor to the D4S for a number of reasons. So without further ado, let's take a closer look to find out why.
 
Original article:
Setting new standards: Nikon D5 Review  


How I Shot ‘Beauty and the Beast’ with a Model and a Tornado

TheDream
Mother Nature can be such a beautiful and powerful phenomena to watch, and if you’re not careful, you can quickly become addicted to it. That’s my problem: I’m addicted, and I have been for a long time now.

I’ve spent the past 16 years of my life traveling countless miles across Tornado Alley, documenting everything from devastating EF5 tornadoes to blinding close encounters with lightning and even having my car nicely remodeled by softball-sized hail. It’s not only an adrenaline rush, but it’s an opportunity to put some extremely powerful moments in front of my lens and to share those moments with the world.
Wedge1
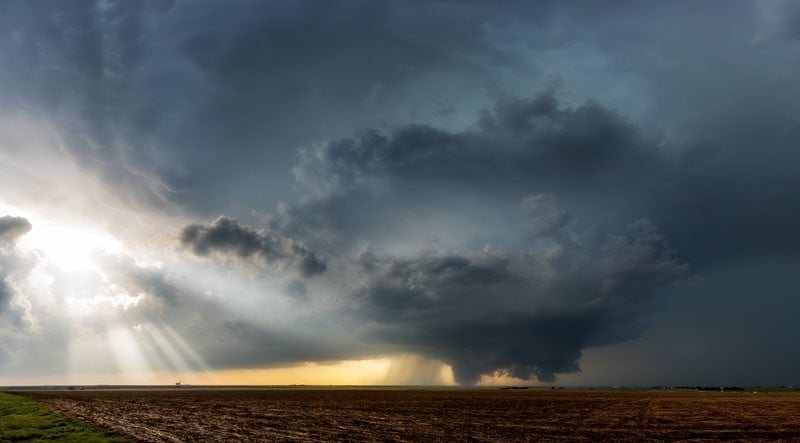
For the longest time I’ve desired to capture an image that displayed the raw power and beauty of nature along with the human element. This past week, I spent six days on the road with two friends, traveling the plains in search of severe weather. The atmosphere was coming together perfectly for an incredible week of chasing.
My friend and fellow photographer, Elisabeth Brentano, happened to bring a nice white dress with her and we discussed the possibility of getting a shot of her in front of a storm wearing the dress. Little did we know, that scenario would come to fruition on May 24, near Dodge City, Kansas. It wouldn’t just be an amazing storm in front of us, we would witness a tornado outbreak with nearly a dozen tornadoes dropping down from the sky in a few hours time. Thankfully, none of these tornadoes resulted in major damage or injuries.
Dodge1
We arrived at our storm a little after it initiated, and I could tell that it meant business. It was organized and already starting to rapidly rotate. We stood on a dirt road for about 20 minutes anxiously waiting as our storm gained strength and eventually put down its first of many tornadoes.
Stinger
Structure
It was a beautiful tornado, but our road network didn’t allow us to safely get close enough to capture the image I envisioned. About 30 minutes later, our storm began spitting out tornadoes left and right. At one time, we had three tornadoes on the ground at the same time. This was our moment. We were able get about a half a mile away from one of the larger tornadoes and had a lush green field to create our shot in.
Twins
Elisabeth jumped out of the car and quickly put her dress on as I assessed the scene and composition that I wanted. The winds were raging and it was quite the battle to get Elisabeth’s dress and hair to cooperate, but after rattling off nearly two-dozen frames, I felt confident the shot was captured and it was time to hit the road the other way back to safety.
All in all, I’m extremely happy with the way the final image entitled, “The Beauty and The Beast” turned out.
TheDream
For those that are interested in the EXIF data for the final shot, here you go: Nikon D810, Nikon 24-70mm at 24mm, ISO 200, f/5.0, and 1/320s


P.S. I’d like to take a moment to state that storm chasing is an extremely dangerous thing to do without prior experience and a background in meteorology. Please don’t try to chase storms without going with someone who has been doing it for a while. If you’d like to go on a chase, there are plenty of amazing storm chasing tour companies out there. I’d like to suggest Extreme Tornado Tours, Cloud 9 Tours, or Silver Lining Tours.


About the author: Mike Mezeul II is an award winning, professional photographer currently based out of Allen, Texas. His portfolio consists of professional sports, advertising, wedding and concert photography, but his work in landscape and skyscape photography truly separates himself from others. You can find more of his work on his website, Facebook, and Instagram.

Photographing a SpaceX Rocket Streaking Across the Night Sky Returning to Earth

What you see here is the 2nd Stage Burn with the 1st Stage Re-entry Burn, which is used to initially slow down to begin the landing process, appearing under the tree limb.

rocket landing

At 1:21am on May 6, 2016, SpaceX continued its run of aerospace brilliance with a night launch of its Falcon 9 rocket, carrying its Japanese communication satellite payload to geostationary orbit. The most spectacular portion of this event was the first successful night landing of the Falcon 9’s first stage onboard their floating platform called “Of Course I Still Love You.” While this was not the first successful landing for SpaceX, it was the first one at sea at night and also one that they predicted to have a high probability of failure due to the dynamics involved with the much higher energy needed to send the satellite to a higher orbit than previous launches.

What does that have to do with me? Well, at the time, I was on Hunting Island in the southern portion of South Carolina doing what I love to do, shooting the Milky Way…. and I captured the moment!

final spacex image

This was my 3rd time out with my new gear, the Sony a7R II and Zeiss Otus 28mm f/1.4 and I can’t tell you how ecstatic I am with both of them in this early honeymoon stage, as they are providing me with the sharpest, most beautiful night skies I’ve ever seen without using star tracker equipment.

This was very reminiscent of my capture of the International Space Station a couple of years ago. If you’ve followed me at all you might remember the night I went out to shoot star trails above Weaver’s Needle in the Superstition Mountains just outside of Phoenix, Arizona, and the ISS photobombed me. Maybe I have a knack for being in the right place at the right time.

star trails

Weaver’s Needle and the ISS

My current method of nightscape shooting involves capturing a series of images and then doing some advanced stacking techniques in Photoshop to remove the noise (rather than using Adobe or other 3rd party noise removal software) and Sony’s mirrorless line of cameras has a decent application that you can install directly on the camera (called Sony PlayMemories Time-lapse) that allows you to automatically capture a series of images, like I want, without having to resort to an external intervalometer. I’m all for less gear, so I’ve been doing it this way for a few weeks now. The downside is that the minimum number of images the application allows is 30, and while that’s more than I need, it still works out to only about 5 minutes of shooting (I’ve settled into 10 second exposures with my current setup) and I’m never going to complain about having extra data just in case.

Sorry for the sidetracking there, where was I? Right. I got out of my tent around midnight as the Milky Way was beginning to rise to the east and headed down to the pitch black beach where there is a plethora of trees slowly getting swallowed up by the sea. It’s an incredible environment to shoot in, but there’s a little wrinkle in all of this and it has to do with turtles. This time of year is sea turtle season in the southeast and the threatened turtles that come up on the beach to lay their eggs (and any little ones that hatch) are highly sensitive to light and often get turned around and disoriented by lights on the beach. For that reason, South Carolina (and presumably other states in the area) has instituted a no lights on the beach policy. Luckily there’s enough light pollution that you can at least navigate without a problem, but not being able to use a flashlight to help with focusing, adjusting camera settings, etc., is a bit of an annoyance. I’m all for helping the turtles though, so I fully support this mandate. And the Sony a7R II is configurable enough so that you can view everything through the EVF. After adding some gaffer’s tape to the lights on the outside I’m able to operate in complete no-light stealth mode.

night sky long exposure

milky way

Capturing the Moment

At around 1:10am I set up by a particular tree that I was interested in and started capturing data for an ISO invariance test, unbeknownst to the countdown happening 250 miles to the south. Since I was still new to the Sony a7R II, I wanted to know what its sweet spot was for ISO settings. I’ve been using ISO 6400 almost exclusively (with some minor exceptions on particular nights) with my old Canon 5D Mark III, but I expect that the Sony can shoot higher without any problem. I still need to work up that data, but it’s coming soon. Since I was already set up on a tree that I sort of liked, I figured I might as well capture my normal Milky Way data. So at 1:17am I turned on the Sony PlayMemories Time-lapse app to fire off 30 frames with a 1 second interval. I stepped back, looked up, and let the sky take me in for five minutes while my camera did its thing. As the camera slowly ticked down to its final few frames, I saw out of the corner of my eye what looked like a firework going off in the distance. I could make out a vertical red trail going straight up to the south of me. From the horizon, it was maybe a couple of fists tall before it disappeared and my timelapse completed while I shrugged my shoulders, wondering.

rocket landing

As I stood there thinking, I remembered two other guys were out shooting as well and I initially thought that maybe they were playing around with a drone because I knew those typically have red lights on them. But I stood and watched for a few seconds and even though the red trail was gone, I could still make out some movement in the sky. It was very reminiscent of a satellite in orbit so I got to thinking that maybe, just maybe, it was some sort of rocket launch. Too bad it was almost due south and I was facing to the east. So I stood there dumbfounded… and waited for about two minutes before I came to grips with what was unfolding. The rocket was no longer going up, but had made a turn and was maneuvering towards my frame. Without hesitation, I hit the shutter button and started another 5 minute timelapse.

By the time it was complete, I could tell that the rocket was long gone. In my haste, I grabbed my tripod and set out to find the other photographers to see if they saw it too. In hindsight, this was a mistake. I always try to take a couple of longer, lower ISO, higher f-stop images with the foreground in focus so that I can blend it in later in post. It always make a more pleasing image when everything looks in focus. So yeah, when I got home and realized that I forgot to do that, I was a little frustrated in myself. But luckily there are some (limited) ways around it, which I’ll get into.

Processing the Image

The next morning, I groggily got out of my tent and drove home to recharge my batteries and see what I had captured on the big screen. The first step in the process is obviously importing the images into Lightroom. I’m running things on a Surface Pro 3 i7 with a 256 GB SSD and 8 GB RAM. I love it for just about everything except image processing. With my old Canon, RAW files were only around 29 MB per file, and it did a rather admirable job in keeping up with my workflow. But the 42MP Sony a7R II RAW files are clocking in at 84 MB per file. If things are settled down, previews have been created, and I’m not zooming in and out constantly, Lightroom can handle it, but the fan kicks in quite a bit and we get to take plenty of breaks while it thinks about things. Taking it one step further, most of my image processing is actually done in Photoshop after I do my initial RAW editing in Lightroom, and once you multiply 84 MB by 30 images, well you’re talking a couple of gigabytes of files in Photoshop, and the short breaks turn into long ones. So it looks like a dedicated desktop mega-editing workstation is in my future, but that’s neither here nor there. Back to the image processing….

First I edit in Lightroom. I don’t want to take away any thunder from working pros who put out impressive video tutorials on how to process images in Lightroom, so I’ll leave that to Google (or I can make recommendations). Here’s what the first image looks like after I complete this stage. I try to mainly focus on the sky with a little bit of shadow recovery in the foreground. I know I can do a little more fine tuning in Photoshop, so I just try to get it close at this point.

Then I sync the settings to all 30 images.

syncing images in post-processing

Finally, I highlight them all and right-click on the first one, click Edit In -> Open as Layers in Photoshop. The first thing I usually do at this point is to highlight all of the layers and set their blending mode to Lighten. This allows the brightest part of each layer to shine through to the layer above it. In landscape astrophotography terms, it creates the star trail effect.

star trail effect

Over the course of five minutes of shooting, the stars are moving through the sky. In reality, the earth is rotating on its axis, but from our perspective, it’s the stars that are moving. If I were looking for true authenticity in my final image, this would be where I would start. But as I looked at it, I decided to deviate a little. The star trail portion of the image was too much because the Milky Way is such a dense part of the sky. My goal was to represent the rocket trail and I felt that the smeared look of the Milky Way was too distracting of an element. I realize this might ruffle some feathers, but at the end of the day I’m trying to create an image that tells the story I want it to tell. And I wanted to tell the story of a rocket launch. So I decided to ditch the star trails and show the rocket launch as an overlay on a clean Milky Way sky. My image, my choice. Here’s my plan:

  1. Clean up the foreground
  2. Clean up a single Milky Way image
  3. Clean up the rocket trail
  4. Combine (1), (2), and (3), add magic pixie dust, crack open a beer and smile at my creation

Foreground

As I was saying earlier, I screwed up. I forgot to take an in-focus shot of my foreground. Not that it would have been easy. Over the next two nights I continued to struggle taking in-focus foreground shots due to the no-lights-on-the-beach mandate. Trying to yoga-ize myself into a position where I could see through an EVF that was low to the ground and pointing up at the sky was painful. And then trying to make out detail on a tree limb in pitch blackness was near impossible. Anyways, that’s not part of this story. I found out a way to get some sharpness out of an out-of-focus image. It’s not perfect, but for an image that has a lot of noise and darkness in it anyways, I can get away with it. That and the tree isn’t the point of the image, so you really shouldn’t be looking at it in the first place.

foreground

To do it was pretty simple. I took the first frame out of my layer stack and applied an unsharp mask and high pass filter to it. Then, to complete the foreground process, I took the top four layers, made copies, converted them to a smart object, and then applied a median stack filter to it. This does a fantastic job of eliminating noise and smoothing things out. Here’s a before and after of the tree and surrounding beach. I think it’s a remarkable improvement on the foreground.

foreground improvement

To finish the foreground, I also used Nik’s Dfine noise removal software (Google made all of the Nik tools free, download them!) to do just a little bit more. It was very minor, but I knew it needed a little more. I also planned on adding this filter to the Milky Way so that the whole image would match up. The hardest part of this process is usually trying to get the foreground and background to match up without there being a distracting demarcation line of no-noise to lotsa-noise.

astrophotography noise

Milky Way

Most of my Milky Way processing is initially done in Lightroom, so for the most part it’s already complete by the time I get here, though there are some additional color, curves, levels, and brightness adjustments that I tend to do in Photoshop to finish all of my images. At this point, there wasn’t much that I did because I knew I’d be doing more once the rest of the image was put together. But to be fair, and to show where I started, here’s the first image in the stack that I used as my base Milky Way image with the clean foreground masked in.

milky way masked in

Rocket Trail

The Falcon 9 rocket raced through the sky for at least 7 minutes before disappearing from view. If you’ve been paying attention, you know that I missed the first 2 of those minutes. But, there’s a reward at the 6 minute mark… the landing, or at least the landing approach, of the first stage of the Falcon 9 rocket. As the rest of the rocket continued to motor on to orbit behind the second stage, the first stage dropped off and successfully landed on a floating platform out at sea. How cool is that?

Props to the SpaceX sleuths on Reddit for determining the high-probability that this is just the re-entry burn. However, they also deem it to be remarkable that it was visible from over 700km of atmosphere.

This is probably the final part of where I used my personal creative freedom in creating my image. The drawback to shooting multiple frames instead of just doing long five minute exposures is that there is a short delay between frames where the camera is clearing the buffer and starting the next exposure. When you combine the layers, you’ll see those gaps between star trails and, in this particular case, the rocket trail. Because of how bright the rocket trail is, I knew I had to fill in the gaps to make it look right. So after some careful clone stamping on each layer to extend the trail over the gaps and then some more extremely careful masking to just select the trails out of each image, I was able to come up with a layer that looks like this, only without the white background. One thing to note… I am TERRIBLE at masking. I don’t want to hear any comments about that. I already know it and need to work on it. It doesn’t really show in the final image because the sky gets put back in behind the rocket trail, but still. It’s a part of the image that I’m not totally proud about it.

rocket trail

The Final Image

The final step in the process is to combine all of the elements and clean things up. The base layer was the Milky Way from the first frame, with a Nik Dfine filter applied to it to smooth out a very small amount of noise without totally degrading the image. The Sony+Zeiss combo is extremely sharp and the noise is well within the bounds of being acceptable and pleasing, so I didn’t need to do much. Then I added two Color Balance adjustment layers, one to the whole layer and then one to just the sky to balance the color out.

From there, the rocket trail was added back in as well as the new foreground layer that showed a little bit more detail in the tree. I added another Color Balance adjustment layer to only this foreground layer since it had a little bit of a color difference from the bottom layers and I wanted to bring it back in line.

The final adjustments were global without masking anything and were a Vibrance layer (added some vibrance, subtracted some saturation) a Brightness/Contrast layer (added a little brightness, subtracted a little contrast), a final Levels layer where I pulled in the white and black points to extend the image to both ends of the histogram and add some extra punch to it, and a light vignette because I like vignettes sometimes.

final spacex image

Final Thoughts

I figure this will probably get lost in the 2500 words above it, but the whole point of this is not to show you how to process your own image, but to give you an insight as to my thought process when I’m processing my images. The specifics of each step won’t help you, but hopefully you’ll come to realize that you’re probably having the exact same conversations in your head that I usually am. And at the end of the day, it’s your story to tell… and this was mine.

Now if you’ll excuse me, time to crack open a beer.

About the Author:
Zach Grether is a photographer who hopes his images will help preserve the night sky in a matter fitting of its greatness. Follow him on Facebook, and Instagram.

Go to full article: Photographing a SpaceX Rocket Streaking Across the Night Sky Returning to Earth

What are your thoughts on this article? Join the discussion on Facebook

Article from: PictureCorrect

PictureCorrect

If you are interested in Digital Photography, check it out here for more details.


from SLR Camera http://ift.tt/1XeYYjx