Tuesday, March 8, 2016

6 surefire ways to improve sharpness in your images

Sometimes, even when using effective image stabilisation or a tripod, images can still come out with a little less bite than expected.
Often it’s difficult to understand why this is the case when we believe we’ve done everything as we should, but the fact is that this could be down to a number of reasons, from issues with equipment and technique to the subject and even environmental factors.
Here are six tips make sure you always stand the best chance of capturing images with clearly defined details.
essential_camera_skills_1_shutter_speed 529f1f443fb54733b478c54e
1. Insure your shots with a minimum shutter speed
Many modern cameras allow you to set a minimum shutter speed, and this is an effective way to ensure images always stand a chance of being captured sharply – particularly when using lenses or cameras without any kind of image stabilisation.
When shooting in the Shutter Priority or Manual exposure modes you will probably already be using an appropriate shutter speed for your scene, although in the Aperture Priority mode it’s easy for shutter speeds to occasionally dip below what’s recommended for that particular focal length.
So how do you set this to the right speed? For general-purpose use, a good idea is to set this to the reciprocal of the focal length of your lens, taking into account any crop factor applied by your camera’s sensor.
So, a speed of 1/50sec would suit a 50mm lens used on a full-frame body, or alternatively 1/80sec or so if using a camera with an APS-C sensor.
If you’re using a camera with a particularly high-megapixel sensor (24MP or 36MP, for example), you may want to set this slightly higher to be on the safe side. On your camera this may be offered in same setting where you can adjust ISO (sensitivity) to an Auto option.
If your subject is moving, consider setting this to a speed that you know will render it sharply in relation to how fast or erratically it moves.
For posed images of people this does not need to be much higher than 1/100sec or so, although for those moving around a speed of 1/160sec or even 1/250sec would be more appropriate. Obviously in these situations you may also wish to employ continuous AF too.
2. Focus peaking
2. Know when not to use focus-and-recompose
The focus-and-recompose technique is a popular way of achieving focus in an image when, for whatever reason, there isn’t an AF point covering the subject.
What typically happens here that that the photographer will use the central or another key AF point to focus on the subject, before recomposing the shot to the desired composition. This usually works well with distant subjects but can cause softness with closer ones.
So why is this? Depth of field increases with subject distance, so when you’re focusing particularly closely to a subject, any shifts in subject or camera position after focus has been confirmed can leave the subject slightly out of focus.
This is particularly problematic with wider apertures where depth of field is shallow, so be aware of this if you do choose to employ this technique here.

How aperture affects depth of field: f/8
f/8
3. Don’t always use the widest aperture…
Wide-aperture lenses are great in low light and when trying to achieve very shallow depth of field, but most don’t give their optimum performance at their widest aperture. In fact, they tend produce sharper images when they are used at a smaller one, such as f/5.6 or f/8.
The main reason for this is because of an image-softening effect known as spherical aberration, which is particularly problematic at wide apertures.
It’s certainly the case that some optics are surprisingly sharp at the widest f-stop, but closing down the aperture – even slightly, thus maintaining the kind of shutter speed and effect you want in your image – can often help details be better defined.
Of course, that doesn’t mean you should always stay away from wide apertures. In fact, you may prefer a slight softness when shooting portraits or when images aren’t likely to be viewed at 100%, and the advantages of a having a very shallow depth of field may outweigh minor losses to sharpness.
Problem No. 5: Diffraction
4. … but don’t always use the smallest either
Although it’s possible to achieve expansive depth of field at very small apertures, push this too far and you may see sharpness compromised.
The reason for this is down to an effect known as diffraction, which concerns what happens with light as it passes around an obstacle of some kind, which in the case of lenses would be the aperture blades.
Most lenses can be stopped down to f/16 or f/22 but if can get the depth of field you need in an image at a slightly wider aperture such as f/11 or f/13, or if you use hyperfocal focusing, you may find this serves your images better.
Face Detection AF
5. Activate Face detection
When capturing people, one mistake many photographers make is focusing on the bridge between a person’s eyes rather than on the eyes themselves.
In some cases this isn’t too great an issue if the aperture is small enough to ensure depth of field renders both in focus, although when shooting close to the subject with a wide apertures – as you may well be doing with portraits – this can mean that the eyes are a little soft.
Obviously the best course of action is to always focus directly on the subject’s eyes, although when shooting multiple images in different compositions, it’s all too easy to slip on the occasional shot.
Activating Face Detection is a good way to ensure that the camera knows what it’s focusing on, and often these systems will try to ensure that the eyes are as sharp as possible.
p2_lower_essentials_3_tripod 33488c05e1e947e3a7b9304df634f4c6
6. Change your technique when using a tripod
Using a tripod can be an effective means of improving sharpness in your images, although even when using one it’s possible to compromise the result in many ways. The key thing to ensure is that the camera remains as static as possible during the exposure, which you can make sure of in a number of ways.
Using a remote release of some kind is a good way to ensure the camera is not touched at the point of exposure, although if you don’t have one, the self-timer option can be used successfully in its place.
Your camera may also have a mirror lock-up mode that allows the mirror to be raised independently of the shutter opening to capture the exposure (also a potential cause of blur), and you may be able to use this in conjunction with a remote release.
Make sure to turn off your image stabilisation system when using a tripod too, as this can create vibrations that work against the very thing the system is trying to prevent.
Your camera or lens may automatically sense then they are being used on a tripod and deactivate image stabilisation of their own accord, so check to see whether this is the case to save you the effort.


The post 6 surefire ways to improve sharpness in your images appeared first on Digital Camera World.


Lowepro Flipside 400 AW Black Camera Digital Camera DSLR Bag Backpack for Canon Nikon Sony

Lowepro Flipside 400 AW Black Camera Digital Camera DSLR Bag Backpack for Canon Nikon Sony


 Capacity:
1 pro DSLR with lens attached (300mm f/2.8) plus an additional body, 4-6 additional lenses, chargers and cords, filters, flash unit and 3 memory cards
Size(Interior): 
 10.6W X 5.9D X 16.7H in./27 X 15 X 42.5 cm
Size(Exterior): 
 11.9W X 10D X 18.1H in./30.3 X 25.3 X 46 cm
Outer fabric:
 600D Polyester, 600D Polyester Ripstop, and High Flow Mesh Nylon
Interior Fabric:
Velex, 210D Nylon, Tricot
Weight:
3.5lbs/1.6kg
Color:
Black 
Items including:
Flipside 400 AW Camera Bag Backpack  x 1 


Monday, March 7, 2016

8 reasons to shoot JPEGs over raw files

8 reasons to shoot JPEGs over raw files


Shooting in Raw is widely viewed as the better approach to shooting JPEGs for more serious, considered photography, but that does mean everyone should try to aim to competently abandon JPEGs? Not necessarily.
More and more photographers are citing many benefits of shooting JPEGs over Raw files, to the point that they will be happy enough to use these straight out of the camera.
It certainly makes sense when you consider that cameras are not only becoming more intelligent, but that they are also highly customisable to allow you to achieve the shot you want with less fuss.
Of course, Raw shooting has many advantages over JPEGs, and these are well known, but in the interests of balance here are a eight reasons why you may want to consider JPEGs.
Music photography tips: shoot raw + JPEG
1.    Smaller files bring many benefits
Although the file size of an image partly depends partly on the subjects within it, Raw images tend to be significantly larger in size than JPEG files. This could be as little as two or three times the size, or potentially even six or seven – and this has many drawbacks.
Your cards filling up faster will be the most immediate disadvantage, and it will also usually take longer to get these images flushed out to your memory card. The need for more, or larger, hard drives means it will ultimately cost you more to store all this information, too.
Shooting sports: JPEG images or raw format - which should you use? Free photography cheat sheet
2. Greater burst depth
Shoot sports or any other action photography? Your camera’s buffer will fill up faster if you capture either Raw or Raw and JPEG images, and this may well slow you down when shooting a burst of images.
Switching to the JPEG option will allow you to shoot for a longer burst, and some cameras claim to allow this up to the capacity of the memory card used. Just make sure your memory card is fast enough to cope with a large stream of images, as this could be a bottleneck you don’t need.
SEE MORE: What is a raw file? We explain the pros and cons
How to apply lens distortion correction in-camera: step 2
3. Instant lens corrections
One of the lesser-mentioned benefits of digital capture over film is that the camera can automatically process out a number of minor lens corrections, such as vignetting, distortion and chromatic aberration.
If you began shooting on film where this wasn’t possible, you may already appreciate how useful and time-saving it is to have this happen without you even thinking about it, particularly if you’re used to using wide-angle or wide-aperture lenses where distortion and vignetting respectively can be problematic.
Of course, it is possible to apply these to Raw files using software, although for everyday images that aren’t likely to be processed, the convenience of instant lens corrections makes a lot of sense.
4. Disciplines you to make it right in camera
Just as shooting on film disciplines you into trying to get the result you want in camera, so can the knowledge that you don’t have a Raw file to fall back on when shooting a JPEG.
Disciplining yourself in this way means you’re more likely to adjust the relevant processing parameters to your liking and make more effort to get it right if you review your images and find something isn’t quite right.
If you’re used to shooting Raw images you may not be aware of just how much is possible in camera.
From checking focus with the zooming controls and using highlight warnings to guide you with exposure, to finely adjusting sharpening settings to suit your specific subject, you may find your camera is more capable that you think.
5. In-camera processing is often good enough
While you may be able to get great results with time and care in post-production, it’s entirely possible that your camera would do just as good a job – and in an instant.
Today’s cameras are sophisticated enough to instantly process out defective pixels, reduce noise only in specific areas of the scene and lift shadowy areas to better balance exposures, so it makes sense to take advantage of these time-saving measures.
The typical camera will offer many colour preset options and the majority of models allow you to either tweak the individual parameters of these or create brand new presets ones should none suit your taste.
Taking a little time to define a few styles that suit your shots will mean that you not only save yourself processing time later, but it will also mean you can either preview your effects as you shoot or at least be able to see this immediately after image capture.
Photoshop_Elements_workflow_photo_editing_CAN59.tut_workflow.step4
6. You’re unlikely to process every image
Sure, it’s a good idea to stick to Raw when it matters, but for casual snapshots is it always necessary? Not only will you not process every image you take but you’re unlikely to view them all at the kinds of sizes where small differences in sharpness and noise reduction make much difference.
Many modern cameras have at least one button which can quickly be used to activate Raw recording, meaning that you can shoot in JPEGs for everyday shots and quickly switch to Raw (or Raw and JPEG) for the images that matter, so check if this is possible on your model.
7. Instant compatibility and use
As soon as you capture a JPEG, it’s ready for use and supported by a wide range of devices. If you need to quickly send it to someone or upload it to a social networking site, or alternatively print it out, copy it or simply view it on a computer or another display, you can do so.
Raw files, by contrast, need specific software programs that have been updated to support that particular camera. Files from particularly new models may not even be supported by your editing program of choice, meaning that you need to wait for an update from the manufacturer before editing it here.
8. Time
The gift of time is one of the greatest advantages of shooting JPEGs. No additional processing of Raw files means you have more time to yourself and you won’t have too wait as long to download, sort through and store all of your images.

Source: http://www.digitalcameraworld.com/2016/03/03/8-reasons-to-shoot-jpegs-over-raw-files/


Canon EF 75-300mm F/4-5.6 III Telephoto Zoom Lens

Canon EF 75-300mm F/4-5.6 III Telephoto Zoom Lens


Canon EF 75-300mm F/4-5.6 III Telephoto Zoom Lens is the lightest 4x telephoto zoom lens in its class. Ideal for sports, portraiture, animals, etc. The telephoto effect can make the picture look comp

More details here.

Sunday, March 6, 2016

Weekly Photography Challenge - Hands

Hands can be just as expressive as the face sometimes, as these images show.

Weekly Photography Challenge – Hands


Elisabetta Orlacchio
By Elisabetta Orlacchio
This week it’s your turn to photograph hands. Human or otherwise – it’s your choice. Find some expressive ones and use good lighting, and compositional techniques to create some great images.
Bill Gracey
By Bill Gracey
Lucio Zandonati
By lucio zandonati
Johnson D
By Johnson d
Jessie Jacobson
By Jessie Jacobson
Giovanni
By Giovanni
Romanlily
By romanlily
Sharada Prasad CS
By Sharada Prasad CS

Share your images below:

Simply upload your shot into the comment field (look for the little camera icon in the Disqus comments section) and they’ll get embedded for us all to see or if you’d prefer upload them to your favourite photo sharing site and leave the link to them. Show me your best images in this week’s challenge. Sometimes it takes a while for an image to appear so be patient and try not to post the same image twice.
 
 
The post Weekly Photography Challenge – Hands by Darlene Hildebrandt appeared first on Digital Photography School.

Digital Photography School

If you are interested in SLR Camera, check it out here for more details.

Nikon 14-24mm f/2.8G ED AF-S Nikkor Wide Angle Zoom Lens

Nikon 14-24mm f/2.8G ED AF-S Nikkor Wide Angle Zoom Lens
Item specifics
Condition:
New: A brand-new, unused, unopened, undamaged item in its original packaging (where packaging is ... Read moreabout the condition
Brand:

Nikon

Type:High Quality, Ultra wide angle, Image StabilizationFocus Type:Auto & Manual
Compatible Brand:For NikonCamera Type:Digital SLR, SLR
Camera Technology:Digital, FilmFocal Length:14-24mm
Maximum Aperture:F/2.8Focal Length Type:Zoom
Mount:Nikon FUPC:018208021635
Detailed item info
 
Product Information
The Nikon Zoom-Nikkor AF-S VR IF ED G Lens is 3.9-inches in diameter and 5.2-inches long, and it weighs in at just 35.3 oz, making it easy to carry along on a shoot. A maximum aperture of f/2.8 and a minimum aperture of f/22 allow this Nikon camera lens to provide clear image in all types of lighting. This Nikon camera lens also takes clear close up pictures, as it can focus on an object just 0.9 ft away from it. The Nikon Zoom-Nikkor AF-S VR IF ED G Lens features automatic focusing, so even an amateur can enjoy taking great pictures with it. For an experienced photographer this wide-angle camera lens also has a manual focusing mode. When using focusing thus wide-angle camera lens, there is little noise, thanks to its silent wave motor. A good lens is a photographer’s number two tool, second only to the camera, and the Nikon Zoom-Nikkor AF-S VR IF ED G Lens is one that won’t disappoint.
Product Highlights
Video 
 
Product Identifiers
UPC018208021635
 
Lens System
TypeHigh Quality, Image Stabilization, Ultra wide angle
Focus TypeAuto & Manual
Focal LengthZoom
Focal Length (mm)14-24mm
ApertureF/2.8
Min Aperture22
 
Compatibility
Compatible BrandNikon
Camera TechnologyDigital, Film
 
Dimensions
Diameter3.9 inch
Weight34.22 oz

Nikon 14-24mm f/2.8G ED AF-S Nikkor Wide Angle Zoom Lens AF-S Nikkor 14-24mm f/2.8G ED lens 21-36mm Effective Focal Length with APS-C Sensor Cameras Ideal for Wide-angle Shots of Landscapes and Scenery Lens
Construction: 14 Elements in 11 groups Contains Two ED (extra-low dispersion) Lens Elements for High Resolution and Contrast Nikon AF-S Zoom Nikkor 14-24mm f/2.8G ED AF Lens Dedicated Front Cap (#4920) Rear Cap Lens Hood CL-M3 Semi-Soft Case Strap for Case hhh ddd jjj ooo --> -->
An optical masterpiece: the ultimate ultra-wide-angle zoom. With a fast fixed maximum aperture of f/2.8, the award-winning AF-S NIKKOR 14–24mm f/2.8G ED delivers truly superlative performance in any situation. Nikon’s exclusive lens technologies and innovations in optical design deliver outstanding sharpness, color and contrast, even in backlit conditions. Tough, reliable, simply exceptional—this is essential glass for serious photographers who demand the best photos and HD videos.


How to Use Bulb Mode on a Camera

How to Use Bulb Mode on a Camera

There is a special setting on all DSLR cameras that allows the photographer to go beyond the longest automatic shutter speed setting of 30 seconds. In fact, this special setting allows infinitely longs exposures to be made. This is the Bulb setting, or Bulb exposure mode.

camera bulb mode

“Busy Street” captured by Boyet Abergos (Click Image to See More From Boyet Abergos)

The shutter speed range on a DSLR camera finishes at 30 seconds. One click below that selection is Bulb, which allows the photographer to manually hold the shutter open for as long as is required as the shutter button is pressed down. The camera bulb exposure setting is only available in Manual mode.

The Bulb mode is basically a creative feature. It allows shots to be taken that are minutes long, rather than seconds. A typical image to capture using this feature is one of star trails when the night sky is clear. Simply aim the camera to the north or south celestial pole, depending on which hemisphere you live.

Another common image to capture is of the trails of vehicle lights when it is dark. These moving lights will create artistic streaks of white and red patterns emitted from the head lights and tail lights of passing traffic. If you are near a traffic junction you may capture orange streaks from indicator lights. And if you’re lucky enough, you may get a streak of blue from the flashing light of an emergency vehicle.

Here then are the three things you must do in order to shoot in Bulb mode, in other words, with the camera’s shutter open:

  • Use a Tripod: Attach the camera to a tripod in order to ensure that no camera movement will ruin the shot. You don’t have to use a tripod so long as the camera is on a solid base, like a wall. Turn off the any anti-shake mechanisms you may might have on your camera or on the lens.
  • Use a Remote Shutter Release: A remote shutter release will prevent vibrations ruining the shot as you press the shutter button. No matter how careful you are, you will always cause a tiny bit of vibration as you depress the shutter button. That doesn’t matter with fast shutter speeds, but in Bulb mode you will record vibrations, however small. If you don’t have a remote cable, use the camera’s built-in self-timer delay, which is just as effective. A two second delay will be adequate.
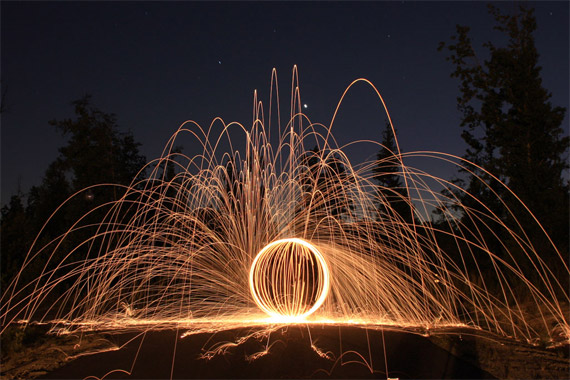
long exposure bulb mode

“Steel Wool Orb” captured by Johnny Dickerson (Click Image to See More From Johnny Dickerson)

Switch to Manual Mode: Since metering is completely irrelevant when using the Bulb exposure setting, switch the camera to its Manual mode. Next, choose an appropriate aperture, like f/8 or f/11, as these apertures offer the best image quality. Also, set the ISO to 100 or 200 in order to minimize sensor noise. Finally, experiment by taking several test shots before capturing the final long exposure bulb mode image.

About the Author
Chris Smith is a photography expert and writer for an online magazine.


Go to full article: How to Use Bulb Mode on a Camera

What are your thoughts on this article? Join the discussion on Facebook or Google+

Article from: PictureCorrect

Source: Picture Correct http://ht.ly/YLUZW More about watches? Visit here.

Find more about digital camera, click here.

Saturday, March 5, 2016

WiFi Extreme Go Action Camera Full HD 1080P 30M Waterproof Pro Camera Underwater Sports DV Mini Camera with IR Remote Control

Screen Size:
1.5 Inch
High Definition Support:
1080P (Full-HD)
Brand Name:
Ckeyin
Package:
Yes
Memory Card Type:
MicroSD / TF
Launch Date:
2015
Optical Zoom:
Fixed Focus
Built-in Memory Size:
Non
Sensor Technology:
CMOS
Image Stabilization:
Electronic Image Stabilization
Touch Screen:
No
Pixels:
2-3 million
NightShot Function:
Yes
Sensor Type:
CMOS
Model Number:
DVR36
is_customized:
Yes
Type:
Portable
Unit Type:
piece
Package Weight:
0.700kg (1.54lb.)
Package Size:
18cm x 10cm x 5cm (7.09in x 3.94in x 1.97in)
Calculate your shipping cost by country/region and quantity.
Quantity:
Ship to:
Unit Type:
piece
Package Weight:
0.700kg (1.54lb.)
Package Size:
18cm x 10cm x 5cm (7.09in x 3.94in x 1.97in)
Our Buyer Protection ONLY protects Payment Methods on AliExpress as below:
  • Bank Transfer
  • QIWI
  • webmoney
  • Boleto
  • Yandex
  • Doku

From This Seller

From Other Sellers

http://ht.ly/YLUZW More about watches? Visit here.

Shutterbug Photo of the Day: "Bearded Dragon" by Lorenzo Cassina

Friday, March 4, 2016

5 Things You Can Change to Take Better Pictures

5 Things You Can Change to Take Better Pictures

“Photographic skills needed!” Or, “photography classes.” These are the search terms many of us need to enter into our favorite search engine so that we can figure out how to take better pictures.

Actually, there’s no shortage of great photographers, but not everyone that totes a digital camera is necessarily a creative genius, nor are they all products of photography classes. That being said, there are some things you can do to improve your photographic skills and abilities.

things to change to be a better photographer

“zeh photographah” captured by Brian Goldfain

Here is a list of 5 things you can change to improve your pictures.

1. Change your camera

Buy a new camera? Maybe, maybe not. There are so many terrible images that are a result of three things: a poor camera, the wrong camera for the type of shot, and bad technique when shooting.

Poor cameras. If you do everything necessary to get a good shot, but it still comes out poorly, it may be time to upgrade.

The wrong camera. Not every camera is capable of taking certain shots. For instance, getting good pictures of a NASCAR race may not be possible with a point and shoot camera. The same is true of other specialty types of photographs, such as macro and wildlife photos. If you really want to take those kinds of pictures, it may be time for an upgrade.

Bad technique. Many camera users are guilty of this. In fact, you should definitely try to “fix” this before abandoning your camera for a new model. The one most common problem comes from the way the shutter button is pressed. There is a right way and a wrong way. To get the best results, push the shutter button down part way and allow the camera to focus, then take the shot by simply pressing it the rest of the way. DO NOT jam your finger down on the button. This will result in a blurred picture most of the time.

2. Change the number

Simply said, take more pictures. Do not rely on the first shot if you can take another. Sometimes this is not possible, like when the subject is your child and she has moved on to the next cute pose. Even if you check the viewfinder to see what the picture you took looks like, take more. You might be in for a big surprise when you transfer your shots to the computer and find that the picture is too blurry or there was an uninvited participant walking into the frame of the photo (and you didn’t notice him when you previewed the shot in the viewfinder). Lots of things can be wrong with a picture. The more photos you take, the more opportunities there are for getting a great shot.

3. Change the mode selection button

Take a walk on the wild side and take the camera off Auto. Sound a little extreme? As long as you take your pictures using the same camera settings, you will keep getting the same kind of shots you have been getting. Try a couple of different things to see the results. For instance, it’s easy to switch to one of the basic modes like “cloudy” or “sports.” This is YOU taking charge of your camera settings one small step at a time. Switch off the automatic flash, and you will see some immediate improvement in some pictures. Experiment with the settings when you have the time and if the photo is not a critical one. By all means, read the manual to see exactly what you can change on your camera to get different results.

4. Change the composition

Great photographers spend time analyzing shots. They do not usually take out their point and shoot camera and start snapping. You can do the same. Think through what you want to accomplish with your shot. Have you heard about the “rule of thirds?” This just suggests that you don’t make your subject the center of every shot. Move the camera frame up, down, or sideways to get a different composition. This one little trick will add interest and drama to many otherwise boring shots.

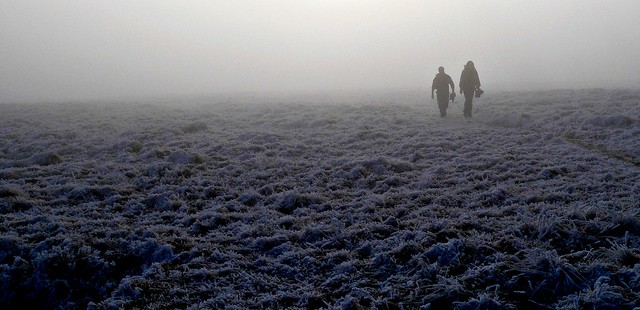
rule of thirds

“Black Mountains near Abergavenny” captured by Les Haines

Also decide how much of the subject you want in the picture. Sometimes purposely getting more or less of the subject can add interest. Again, taking more pictures is a good strategy as you experiment with composition.

5. Change your position

Get mobile! Move closer, move farther away. Move to one side or another. Change your perspective by moving your camera above or below where you would normally shoot.

You can get better pictures by just paying attention to these five tips.

About the Author:
Wayne Rasku is an amateur photographer. You can find him at digital-photographic-resources.com with more info about DSLR cameras and portrait lenses.


Go to full article: 5 Things You Can Change to Take Better Pictures

What are your thoughts on this article? Join the discussion on Facebook or Google+

Article from: PictureCorrect

Source: Picture Correct http://ht.ly/YLUZW More about watches? Visit here.

Tamron SP 35mm & 45mm f/1.8 Di VC USD review

At last, it's prime time for Tamron as the lensmaker enters the fray with a brand new pair of fast, up-market lenses. Find out how they perform in our Tamron SP 35mm and 45mm f/1.8 review.

The post Tamron SP 35mm & 45mm f/1.8 Di VC USD review appeared first on Digital Camera World.

http://ht.ly/YLUZW More about watches? Visit here.

Triopo TR-586EX C Wireless Flash Mode TTL Speedlite Speedlight For Canon 5D3 7D 60 DSLR Camera as+TF-361for Canon Flash Trigger

Thursday, March 3, 2016

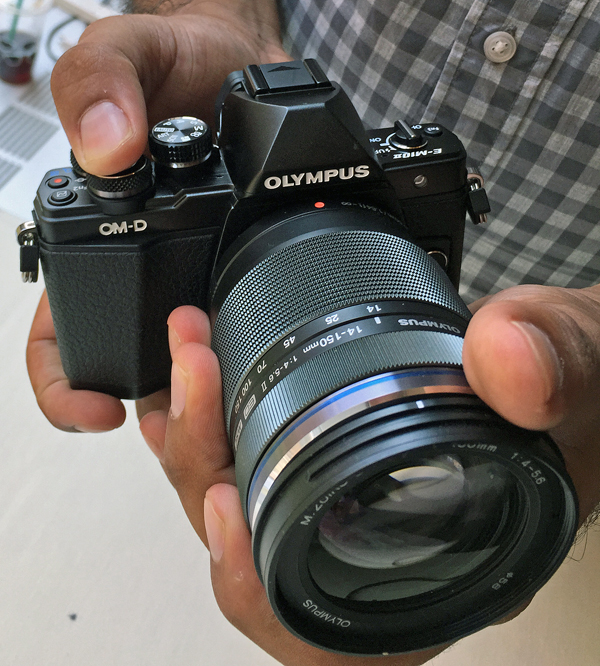
Olympus Unveils Small, Retro-Styled OM-D E-M10 Mark II Mirrorless Camera (Hands-On Photos)

Olympus Unveils Small, Retro-Styled OM-D E-M10 Mark II Mirrorless Camera (Hands-On Photos)
Show Promo Image

Olympus took the wraps off a new entry-level mirrorless camera this morning: the small and retro-styled Olympus OM-D E-M10 Mark II. Like several of Olympus' models in its mirrorless camera lineup, the E-M10 Mark II uses a 16-megapixel Live MOS sensor in the Micro Four Thirds Format.

Tue, 08/25/2015
Source: Photography -Shutterbug http://ht.ly/YLUZW More about watches? Visit here.

Sunday, December 27, 2015

Sony Alpha A7S Mirrorless Digital SLR Camera 4K Wi-Fi Body +1 Year Warranty. NEW

Sony Alpha A7S Mirrorless Digital SLR Camera 4K Wi-Fi Body

ITEM DETAILS AND DESCRIPTIONS – PKG #8297

Sony Alpha a7s Mirrorless Digital Camera

Sony Alpha a7s Mirrorless Digital Camera

The Sony Alpha a7S Mirrorless Digital Camera features a full-frame 12.2MP Exmor CMOS sensor and BIONZ X image processor to enable notable video and still image quality with an expansive dynamic range, low noise, and extended sensitivity to ISO 409600. At the sensor level, this full-frame sensor features a unique on-chip gapless lens design, which incorporates small lenses between neighboring pixels in order to increase light-gathering efficiency and promote greater image quality across the entirety of the sensor plane. The sensor and processor combination also avails a wealth of speed throughout the camera system, including a top continuous shooting rate of 5 fps, support for 4K video recording, and a fast 25-point contrast-detection AF system with sensitivity to -4 EV.

* 12.2MP Full-Frame Exmor CMOS Sensor
* BIONZ X Image Processor
* Gapless On-Chip Lens Design
* 3.0″ 921.6k-Dot Tilting LCD Monitor
* XGA 2.36M-Dot OLED Electronic Viewfinder
* Full HD Recording in XAVC S
* 4:2:2 UHD 4K Output via HDMI
* Full Pixel Read-Out, S-Log2 Gamma
* Expandable Sensitivity: ISO 50-409600
* Fast Intelligent 25-Point AF System

In The Box:

* Lithium-Ion Rechargeable Battery
* Battery Charger (Black)
* AC Adapter
* Micro USB Cable
* Body Cap
* Shoulder Strap
* Cable Protector


Visit http://slrcamera.org/ for more SLR Cameras.


from SLR Camera http://ift.tt/1VlbQA6

Sony Alpha A7S Mirrorless Digital SLR Camera

Sony Alpha A7S Mirrorless Digital SLR Camera 4K Wi-Fi Body

ITEM DETAILS AND DESCRIPTIONS - PKG #8297

 
Sony Alpha a7s Mirrorless Digital Camera
 
 
Sony Alpha a7s Mirrorless Digital Camera


Sony Alpha a7s Mirrorless Digital Camera

The Sony Alpha a7S Mirrorless Digital Camera features a full-frame 12.2MP Exmor CMOS sensor and BIONZ X image processor to enable notable video and still image quality with an expansive dynamic range, low noise, and extended sensitivity to ISO 409600. At the sensor level, this full-frame sensor features a unique on-chip gapless lens design, which incorporates small lenses between neighboring pixels in order to increase light-gathering efficiency and promote greater image quality across the entirety of the sensor plane. The sensor and processor combination also avails a wealth of speed throughout the camera system, including a top continuous shooting rate of 5 fps, support for 4K video recording, and a fast 25-point contrast-detection AF system with sensitivity to -4 EV.
* 12.2MP Full-Frame Exmor CMOS Sensor
* BIONZ X Image Processor
* Gapless On-Chip Lens Design
* 3.0" 921.6k-Dot Tilting LCD Monitor
* XGA 2.36M-Dot OLED Electronic Viewfinder
* Full HD Recording in XAVC S
* 4:2:2 UHD 4K Output via HDMI
* Full Pixel Read-Out, S-Log2 Gamma
* Expandable Sensitivity: ISO 50-409600
* Fast Intelligent 25-Point AF System
In The Box:
* Lithium-Ion Rechargeable Battery
* Battery Charger (Black)
* AC Adapter
* Micro USB Cable
* Body Cap
* Shoulder Strap
* Cable Protector

Visit http://slrcamera.org/ for more SLR Cameras.

Wednesday, December 2, 2015

Photoshop CC 2015 update and Fuse CC (Preview) now available

Adobe has updated Photoshop CC 2015 with the new features it detailed a few weeks ago as its MAX conference. Among the new, mostly designer-oriented features is a high-contrast touch-enabled interface, the ability to customize your Photoshop CC toolbar, direct SVG importing, Artboard improvements and support for Fuse CC, a 3D design application.

Joining the Photoshop CC update is the release of Fuse CC (Preview), which can be connected with Photoshop for ‘significantly greater design flexibility and creative options.’ At this point, Fuse CC is only available in English.

Articles: Digital Photography Review (dpreview.com)

If you are interested in Digital Camera, check it out here for more details.


from SLR Camera http://ift.tt/1OxcgT9

Hot rumor! Nikon bought Samsung NX mirrorless tech!

Share
Nikon_Samsung
The following rumor comes from TRUSTED sources! It’s a news coming exclusive on Nikon-Mirrorless.com (forum) and Mirrorlessrumors.com (blog) first and to get more of those please subscribe our RSS feed, Facebook page and Twitter stream. If you copy that news please credit us..thanks :)
Nikon acquires Samsung NX tech!
The past weeks we had long chats with our Samsung sources about the recent shut down rumors. And they told us the reason why Samsung is stopping the camera sales: Nikon acquired all the Samsung NX tech! That acquisition could (I said could!) be made public in January at the CES. As we have been told Samsung will have a major press announcement there.
What Nikon plans to do:
Nikon will use Samsung NX resources to launch their professional mirrorless system. It is yet unclear if Nikon will keep the NX mount or use an own new mount. That info is not accessible to our Samsung sources (it’s a decision that will be taken by Nikon). The “resources” we are talking about also include Samsung sensor tech, video tech and processor engine. Pro and Cons of the partnership can be read and discussed here on Nikon-mirrorless forum.
Nikon, Sony and sensors:
Samsung sources clearly told us it was Nikon priority to create a serious competition to Sony. And to do that they decided to buy the current Samsung NX expertise and enter a new sensor partnership. Samsung sensors are known to be as good if not better than Sony sensors. See the NX500 vs A6000 sensor score comparison at DxOmark (discuss at NikonMirrorless.com). If that sensor tech will be used on the new mirrorless system only or also on DSLR cameras is yet unclear.
Summary: This is what happens:
1) Samsung stops NX sales
2) Nikon buys the current Samsung developed NX tech
3) Nikon will also enter a strong partnership with Samsung. Samsung will keep developing and selling sensors to Nikon.
4) Nikon will launch a new professional mirrorless system based on Samsungs acquired technology.
More details will be posted and discusses on a new Nikon mirrorless forum we just launched: nikon-mirrorless.com. Please subscribe there to get detailed news in advance. Also let us know in that Nikon Mirrorless Thread what you hope to see from Nikon. And vote if Nikon should keep the NX mount or not.
Stay tuned!
–
Some more discussion: Should Nikon revive the “old” FM desing style on their new mirrorless cameras?
Share
The post Hot rumor! Nikon bought Samsung NX mirrorless tech! appeared first on mirrorlessrumors.
mirrorlessrumors
If you are interested in Digital Camera, check it out here for more details.


from SLR Camera http://ift.tt/1YHFRfy

Monday, November 16, 2015

Nikon AF-S Nikkor 70-200mm f/2.8G ED VR II Lens 2185

Nikon AF-S Nikkor 70-200mm f/2.8G ED VR II Lens 2185


Item specifics

Condition:
New: A brand-new, unused, unopened, undamaged item in its original packaging (where packaging is … Read moreabout the condition
Brand:

Nikon

Maximum Aperture: F/2.8 Focus Type: Auto & Manual
Mount: Nikon F Camera Type: Digital SLR, SLR
Seller Warranty Coverage:: Manufacturer defects.Same as manufacturer warranty Focal Length: 70-200mm
UPC: 689466250459 Focal Length Type: Zoom
Warranty:: 1 year USA Warranty for parts & labor, by seller Type: Telephoto, High Quality, Image Stabilization
MPN: 2185 Compatible Brand: For Nikon
Imported Model: Manufacturer warranty not applicable Camera Technology: Digital, Film

Detailed item info

Product Information
Nikon Nikkor AF-S is a telephoto lens with zoom capability and a focal length of 70-200 mm and an aperture of f/2.8. This Nikon camera lens is quick focusing with vibration reduction (VR) and ED glass for reduced chromic aberration at high magnification levels. An auto and manual camera lens is quickly switched from auto to manual focus and includes internal focus (IF) for balance and smoothness of focusing. The Nikon Nikkor AF-S is a G-design allowing for select Nikon AF SLR camera bodies to select apertures. This Nikon camera lens also features an exclusive Silent Wave Motor (SWM) creating optimal quite operation of the lens. The auto and manual camera lens uses no power during manual operation, and also includes Nikon Super Integrated Coating (SIC) for effective color reproduction and limited ghosts and flares. The Nikon Nikkor AF-S is a capable telephoto lens with all the quality one expects from a high performance Nikon lens.

Product Highlights
Video
Product Identifiers
UPC 018208021857
Lens System
Type High Quality, Image Stabilization, Telephoto
Focus Type Auto & Manual
Focal Length Zoom
Focal Length (mm) 70-200mm
Aperture F/2.8
Min Aperture 22
Compatibility
Compatible Brand Nikon
Camera Technology Digital, Film
Dimensions
Diameter 3.4 inch
Weight 52.91 oz


Features and Functions:
  • Fast f/2.8 Zoom-Nikkor Lens
  • Nikon VR II Image Stabilization
  • Internal Focus (IF)
  • Close Focusing to 4.6′
  • Silent Wave Motor
  • Rounded 9-Blade Diaphragm
What’s Included:
  • Front & Rear Lens Caps
  • HB-48 Bayonet Hood
  • CL-M2 Lens Case
  • Built-in Tripod Collar
  • Removable Tripod Foot
  • Shoulder Strap
Description:

The Nikon AF-S Nikkor 70-200mm f/2.8G ED VR II Lens features an innovative Vibration Reduction (VR) system that allows handheld telephoto zoom shooting even in poorly lit conditions. The VR system minimizes image blur caused by camera shake, and offers the equivalent of shooting at a shutter speed 4 stops faster than what the camera is set for.

This is the perfect lens for low-light, sports, fashion, portraits and other images that require distance between the photographer and subject.


The post Nikon AF-S Nikkor 70-200mm f/2.8G ED VR II Lens 2185 appeared first on SLR Camera.


from SLR Camera http://ift.tt/1MhGRBr